Here is my first stained glass piece done in the Tiffany style:
 I took off the frame to show you the edges so I can try my very best to explain this process. Unfortunately I don't have the equipment to show you what I had to do to make this but I can google an example.
To begin with I had to cut all these separate pieces and try to get them to match. The lower petals of the flower and the white pieces filling it in were a bitch to cut. They had to fit like a puzzle. A perfect puzzle. At least to my standards. When I was done using the glass grinder, I was almost in tears because my pieces looked like I was trying to fit a square peg into a round hole. The teacher promised me the soldering would be kind but I know I could have done better. Someday I may be able to make stained glass church windows but not without many good cries inside the church itself.
Soldering looks like this: (This illustration is from Lancaster Stained Glass.)

Each piece of glass has been taped with a kind of copper foil amd then a flux was painted on. The blue tape here is just used to hold each piece together as the person soldering uses the hot soldering iron mixes the foil with the roll of wire. This part of the process is easy but mistakes can still happen. If you heat the glass to much it explodes. If you fret over the soldering to much it looks burnt. Hence the title of this post. I left giant blobs between my pieces of glass. I wish the blobs hadn't been so blobby but, again, like I said in my very first post in this blog, I suppose it's all in the eye of the beholder. It may look okay to some and could be a design choice but I would have chosen to thin out the blobs.
Here's where I cheated on this project and I'll admit to it. Once I was done soldering, it was all silver and shiny. I painted the patina on so it looked older. This design choice made it all come together nicely:

Here is my finished piece again catching some sun:
 Blobby or not, I like it. Like someone said in class, it looks like an old fashioned quilt square. I love the colors I used. I can't wait until I get to try making another stained glass piece. I have one more to show you in a future blog and I hope there will be more to come.
 I printed it out and taped it to the inside of a votive candle holder and started to mosaic over the picture, onto the glass.

 I used a glass cleaner and I shined it up nice and then I used a tile sealer over it all. I didn't feel the need to take pictures of that process because it's rather simple and boring. You don't need to see me put sealer on a sponge and dab it over the grout. All the sealer does is adhere the sand in the groat together so it won't come off and water won't ruin the surface. It's all sealed up good and that's hard to show so you'll just have to trust me. And I am trustworthy!
 .jpg)
.jpg) Yes, wurwolf, those are my hands. I am covering them to protect them from the lye in the grout... even though it looks like I'm getting ready to give a prostate exam. These gloves are a nursing home special so I feel very safe for anything that comes my way!
Yes, wurwolf, those are my hands. I am covering them to protect them from the lye in the grout... even though it looks like I'm getting ready to give a prostate exam. These gloves are a nursing home special so I feel very safe for anything that comes my way! Here is the batch of grout that I whipped up. This is a sanded grout which means it does contain sand. You'll see why that is nice later.
 Once the grout is between every tile, I like to use this shish-kabobby stick thing to clean off the surfaces. I pick away at the places with the clumpy grout or uncover the tiny pieces that the grout has hidden away. This part of the process can be compared to being an archeologist digging for relics or a dental assistant scraping plaque off teeth. This is where the sanded grout is nice because it comes off easily. It dries and when you scrape into it, it becomes a nice sand that cleans off easy. I like to do this part of the project in two days. Day one with the soft, wet grout and day two when it's hardened and nearly set.


 I taped it to the inside of the pickle jar and used bits of stained glass and tesserae. I liked the effect of the tesserae. Without light it looks one color but with a light behind it, it's an all new color. Around the top of the pickle jar I used those little glass blobs you can buy for flower vases or fish bowls. I liked the glass blobs because they were black but shiny like hematite rocks.


 This is where I began my project early yesterday. As you can see, I already cut out the flowers and I was getting ready to chop up more pieces to fit in around the flower on the top of the keepsake box. The wheel cutters are still a part of this process. The glue I'm using is called WeldBond. It's like Elmer's Glue but stronger. Much stronger. Glue-your-own-fingers-together stronger. It dries very quickly.
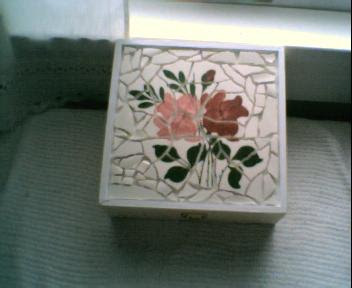 And here is the finished product. Finished but not grouted. I'll do that in the next few days. I'll blog the process of that too.