Monday, August 13, 2007

Lazy Summers

Sorry for keeping you all in such suspense over PM's Parodied Puss on a Perfect Plate about to get Pinched. You'll just have to stay on your toes a little longer.

Summer caught up with me big time so I haven't had a chance to break the plate nor make any more mosaics. But since I've been traveling so much this summer I came across others who make mosaics also. In fact, it could be arguable that they are perhaps better and more diligent than myself in this art and maybe have enough left over broken glass to make themselves a parking lot out of it.

Welcome to Angel Foods in Truro, MA. (Or Provincetown, depending on who you ask.)

This place sells all sort of gourmet snack and treats and it's just a cool place. I went here to get snacks to take back to my hotel when I looked down at the parking lot and noticed glass everywhere. The glass came from plates, tiles, cookie jars and even toilets.

The man next door is an artist and I'm embarrassed to admit now that I can't remember his name. When I do, I'll mention it here but I met him. He came out into the parking lot to take a picture of mom and I picking up these pieces of glass. He was very kind and talked to us about he got started in mosaics. He allowed us to take some of the glass with us because he likes to see his glass scraps get used in other people's projects.

Here are the pieces I gathered:


I doubt that any of these pieces came from a toilet. I tried to get the ones that looked the most like Blue Willow and I have never in my life seen a Blue Willow toilet. Then again I guess there's a first time for everythng.

I did lots of shopping in PTown and I'll take pictures of some of the things I got later. Since I keep the mosaic pieces I collected with some glass beads I bought, here's a darkened picture of the glass beads:

Someday these will be a part of something. I can't wait. I'll blog about it when I do. And soon I'll blog about the wonders of Sculpey Clay! :o)

Tuesday, April 10, 2007

Plate Challenge 2007!: Part One of Part Two

Remember the last plate challenge? I had those pretty flowers in the center of the plate and I wanted to break only the rim and keep the flowers intact. On the first cut, I broke right through the flowers. I cussed and cried and didn't think I'd try that again too soon.

Well here I am giving it another shot. I bought a load of plates from a dollar store having a going out of business sale. All they had left were purple plates so I guess I will need to have a purple plate project some day in the future.

To remind you all what the plate challenge is, the object is to take a plate with an image in the center and use the wheel cutter to break the glass around the image with out destroying the image itself. When I did this in class we drew hearts and flowers and all of my attempts failed miserably. I decided that this time I just needed something in the center I would never want to break. Something that means a lot and I'd never want to harm in a million years. I chose to use the image of a trusted friend:

I chose Pharaoh Mobius. Who'd want to break that face, huh? It's so cute and poiny.

I took a wheel cutter to the rim of the plate and cut. The first cut broke off little bits off the rim but none brutally cracked PM's lovely mug.

So far so good. PM's puss is presently perfect. The rim seems to want to break apart nicely and not straight through his mouth like I might have expected.

Many cuts later and PM remains okay. I'm really glad how well the rim wants to bust up without cracking into the center where PM smiles cheerfully. This is great!

But I am so totally not done. While the rim has been removed, there's another obstacle:


Underneath the plate there is this rim. This could cause me some issues. Actually, it could cause PM some problems.

Tune in next time for the adventures of "PM's Periled Puss!"

Thursday, April 5, 2007

My Last Project

Here is my final completed project:


This is an ornament I made just before Christmas. As you can see, it's made just like the last stained glass piece. I covered each piece in foil and soldered them all together. The only clear difference is the type of foil I used. The insides of the ornament got the straight foil while I used a nice scalloped foil on the outside. I was the only one in class who used this because I was the bravest! I knew my heart would look awesome with it so I had no other choice but to gird my loins and try it. I think it looks gorgeous!


Here is my peice again stuck to a suction nipple, catching come sun.

If I could do some things differently, I would have soldered the inner parts thicker so you wouldn't see the seams. Also, this heart was all cut from the same piece of glass but the upper right side was a bluer peice. It looks weird to me. Also, all the grains in the glass could have matched better. It would have given the heart a more ethereal quality.

Aside from that, I really like this ornament. It can be used year around, not just for Christmas.

And now, because one Tork demanded it, here is another cat picture:

Emma Vs Godzilla!

BTW, I'm going to get back to the organization now like I said I would before. I got lazy and never really started but since I'm out of projects and the basement flooded again, now is as good a time as any. Unil next time, "MLAAAAAAAAAAGH!"

Wednesday, March 28, 2007

Stained Glass Blob Blues

I went back to class with the same teacher to learn how to make a stained glass window. It's really not a huge leap from grout to soldering but it is more difficult. BTW, there is some discussion about if the word is soddering or soldering. I am guilty of saying soddering but I just have to remember this Urban Dictionary entry and I'll never forget. Ow!

Here is my first stained glass piece done in the Tiffany style:

I took off the frame to show you the edges so I can try my very best to explain this process. Unfortunately I don't have the equipment to show you what I had to do to make this but I can google an example.

To begin with I had to cut all these separate pieces and try to get them to match. The lower petals of the flower and the white pieces filling it in were a bitch to cut. They had to fit like a puzzle. A perfect puzzle. At least to my standards. When I was done using the glass grinder, I was almost in tears because my pieces looked like I was trying to fit a square peg into a round hole. The teacher promised me the soldering would be kind but I know I could have done better. Someday I may be able to make stained glass church windows but not without many good cries inside the church itself.


Each piece of glass has been taped with a kind of copper foil amd then a flux was painted on. The blue tape here is just used to hold each piece together as the person soldering uses the hot soldering iron mixes the foil with the roll of wire. This part of the process is easy but mistakes can still happen. If you heat the glass to much it explodes. If you fret over the soldering to much it looks burnt. Hence the title of this post. I left giant blobs between my pieces of glass. I wish the blobs hadn't been so blobby but, again, like I said in my very first post in this blog, I suppose it's all in the eye of the beholder. It may look okay to some and could be a design choice but I would have chosen to thin out the blobs.


Here's where I cheated on this project and I'll admit to it. Once I was done soldering, it was all silver and shiny. I painted the patina on so it looked older. This design choice made it all come together nicely:


Here is my finished piece again catching some sun:


Blobby or not, I like it. Like someone said in class, it looks like an old fashioned quilt square. I love the colors I used. I can't wait until I get to try making another stained glass piece. I have one more to show you in a future blog and I hope there will be more to come.

Monday, March 19, 2007

Still Unfinished

I'm still working in chronological order through all the mosaics I've made (sort of) and I want to show you one that I started and will someday finish. I started it right after the pickle jar and I was making it the same way. I used a picture like the one below:
I printed it out and taped it to the inside of a votive candle holder and started to mosaic over the picture, onto the glass.

As you can see, I taped the image onto the inside of a curve so that's why the inside of the candle holder is stuffed with tissues and a toilet paper roll. I wanted to push the image into the curve.


I'm not quite done with the petals of the poppy but even when I do that, I'm not sure what else to fill in the spaces with. Maybe more poppies or maybe leaves. I don't really know what I want to do and that's why this project stalled. I do know one thing. I want the grout to be black. I bought some black grout from Michael's and I've never used anything like it. It seems like a sanded grout so it shouldn't give me trouble when I get to that poin. Fingers crossed.


Now let's skip the rest of the mosaic talk. I have told you all that I have a cat named Emma but I also have a cat named Artie. He doesn't usually get in the way when I make mosaics so that's why he's not mentioned but I'll bring him into this. Here he is trying to sleep:

Isn't he cute? He's my little, stinky boy and I love him. He's an old, stubborn boy too. He likes to fight with Emma and this chair he's in is a prime poin of confrontation. Looks like Artie's won.... for now!

Thursday, March 15, 2007

Complete, yet Unfinished

My project is all done, sort of. Voila:

I used a glass cleaner and I shined it up nice and then I used a tile sealer over it all. I didn't feel the need to take pictures of that process because it's rather simple and boring. You don't need to see me put sealer on a sponge and dab it over the grout. All the sealer does is adhere the sand in the groat together so it won't come off and water won't ruin the surface. It's all sealed up good and that's hard to show so you'll just have to trust me. And I am trustworthy!

If you haven't noticed already, at the corner of the keepsake box I dripped some primer paint. Someday I will get around to sanding that spot off and maybe repainting it. I'm not in a hurry to paint the rest of the box. All this project was really about was to practice cutting the plate and gluing it to the surface of the keepsake box. I think it went well because I learned tons about using a wheel cutter and what I would do differently. Go me!


My next project that will be fun and I will totally document it for the blog. I will be reorganizing my glass collection. I've been steadily collecting mugs, plates, stained glass and other stuff and I was keeping it in my basement. Over the summer the basement flooded so I have to organize the slightly muddy stuff and the stuff that was piled on top of other stuff. I just know that during this process I'll be rediscovering awesome stuff that I forgot I bought. I'll get cool ideas and we'll all rejoice.


In the meantime I will still be showing off other completed projects but I do have one uncompleted project I can show you now that I found a few days ago stuck between some magazines.


I put it in the window to try and show off the light going through it but there it's much light outside right now. I'm too lazy to take the picture again so I'll explain what you're seeing. This was technically my first mosaic. In class, my teacher was trying to show us how easy it was to cut glass with a scorer and a wheel cutter. The lesson wasn't just about learning to use the tools but it was also about not being afraid of being cut by the glass. She told us that if you have a fear of being cut by glass then you should leave class now because you will get cut. A lot. And I did. I was first student to draw blood while making this pear and I proudly showed it off. Not to be outdone, the lady who cut herself after me actually held up her finger and grunted like Tim Allen on Home Improvement. Several times. We all moved away from her.

As you might be able to see, I drew an outline of a pear on the glass and then cut pieces to fill it in. I used a lighter green for the leaves, a darker green for the pear itself and then I used a peachy colored glass to give the pear an accent. It looks like the window reflection you'd see on an apple. I don't really care if most pears don't do that. I like it. It has character like me!

Someday I'd like to find a picture frame to glue it into and fill in the space around the pear and use it as a suncatcher. If I ever do that, I'll be happy to blog it all. :o)

Monday, March 12, 2007

Grouting 101

Let's GROUT!

Yes, wurwolf, those are my hands. I am covering them to protect them from the lye in the grout... even though it looks like I'm getting ready to give a prostate exam. These gloves are a nursing home special so I feel very safe for anything that comes my way!

Here is the batch of grout that I whipped up. This is a sanded grout which means it does contain sand. You'll see why that is nice later.

Now, every batch of grout that I mix up is a learning experience for me. The consistancy of the grout to supposed to match that of mashed potatoes but since I've never had sandy mashed potatoes, I have to use my best judgment. It looks like I got close with this batch. YUMMY!


To start grouting, you simply glop it onto the mosaic and push it into every space between the tiles. This is where the gloves are nice. This is a messy job but fun. It's the poin where you start to see the whole project come together. The places that you one saw as problem areas while cutting and gluing, you see the grout fill them in. Everything comes together. Then the gloves come off!

Once the grout is between every tile, I like to use this shish-kabobby stick thing to clean off the surfaces. I pick away at the places with the clumpy grout or uncover the tiny pieces that the grout has hidden away. This part of the process can be compared to being an archeologist digging for relics or a dental assistant scraping plaque off teeth. This is where the sanded grout is nice because it comes off easily. It dries and when you scrape into it, it becomes a nice sand that cleans off easy. I like to do this part of the project in two days. Day one with the soft, wet grout and day two when it's hardened and nearly set.

I'm going to work on day two today and blog the final part of the project when it's all nice and clean and ready to be sealed.

//latex gloves for wurwolf!

Thursday, March 8, 2007

FIRE!

Because one person requested it, I put a tea light in the pickle jar and lit the little sucker up. Here are some pictures:

I like it! It's all bright and colorful and cool and awesome! I should put this in the window and light it at night so people driving by can be jealous of it.

Wednesday, March 7, 2007

My Tie-Dyed Pickle Jar

So far I've shown you two mosaic projects that I made in class. Once class was over, I still had the mosaic bug so I looked for projects to work on completely on my own. I found a pickle jar in the fridge and hastened to empty and mosaic it.

My teacher told us about what she does when working with glass and it seemed simple enough: Tape the picture you want to the inside of the glass and mosaic over it. I Googled some tie-dye images because I knew they'd have tons of color and I wanted a small image so it would be pixelated (sp?) when I enlarged it. I chose this image:

I taped it to the inside of the pickle jar and used bits of stained glass and tesserae. I liked the effect of the tesserae. Without light it looks one color but with a light behind it, it's an all new color. Around the top of the pickle jar I used those little glass blobs you can buy for flower vases or fish bowls. I liked the glass blobs because they were black but shiny like hematite rocks.

I have yet to find a decent way to cover up the jar ridges but I'm in no hurry.

Usually I discuss the things I would have done differently. I don't have anything to list here. I love it!

I will mention that it was a challenge to glue this on a curve. The WeldBond dried fast but this project took a while as I let it dry. I had to turn the pickle jar little by little. I must add that working with those little yellow peices and turning the jar did seem like I was working on corn-on-the-cob at times.

I could use this jar for several things but right now I'm using it for part of my giant pen collection. I could also use it as a votive candle holder or a money jar but right now it looks very cute next to my computer holding my Toy Story 2 pens:


Monday, March 5, 2007

Glue Boogers and Cat Hair

I'm going to take a moment in this blog to explain some mosaic terms I've been omitting so if I use those terms in the future, you'll know what I mean. Everything but the "sand" in my first project is stained glass. The weird tiles with the lines carved into them were called vitreous glass tiles or tesserae. They are Italian made even though the ones I buy seem to come from San Francisco, CA.

In the checkers board I used a coffee mug and in my current project I'm using a plate. While you may think that they are just mere coffee mugs and plates, they are actually called pique assiette (or picassiette). The term was created in 1938 after some French guy named Raymond Isadore who covered his entire home in pique assiette. His neighbors hated him and the eye sore he was creating so they called him "le Pique Assiette!" which means "plate stealer!" Obviously the term is now used for the plates, coffee mugs and other found glass so non-French speakers can sound intelligent when discussing mosaics.

This is where I began my project early yesterday. As you can see, I already cut out the flowers and I was getting ready to chop up more pieces to fit in around the flower on the top of the keepsake box. The wheel cutters are still a part of this process. The glue I'm using is called WeldBond. It's like Elmer's Glue but stronger. Much stronger. Glue-your-own-fingers-together stronger. It dries very quickly.


Emma helped. She watched the entire process. She liked the part where I cut the plate inside the plastic tub. She could see the pieces fly all over and she would sometimes lunge at the outside of the tub. I guess it must have been a slow day for birds flying into the window yesterday.

She was very cute. I don't think she left me all day. Next time, however, I'm putting a hairnet on her tail. She was always trying to stick it in my way.

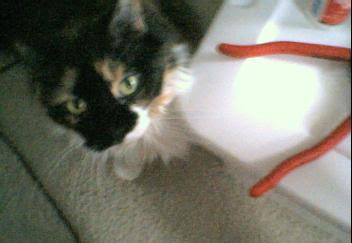
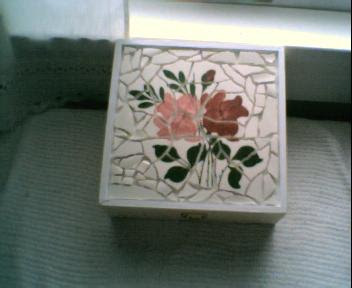
And here is the finished product. Finished but not grouted. I'll do that in the next few days. I'll blog the process of that too.

Overall, there are things I would do differently. This plate was hard to bust apart. It didn't cooperate quite the way I would have liked. And plate rims are a bitch try and cut out. I hope I didn't ruin the wheel cutter. Those are expensive along with everything else attached to this hobbie.

The one thing that I found working too well was the gluing process. I'll have to remember for the next time that the strongest adhesive agent around is glue boogers and cat hair. This entire project would not have been made possible without it.

Until next time, "MLAAAAAAAAGH!

Wednesday, February 28, 2007

Plate Challenge 2007!

I started a new mosaic project so I thought I'd show off the "the plate challenge" since my project involves breaking a plate. I'll be using pieces of a broken plate on top of a keepsake box. I found a nice plate at the local SPCA Thrift Shop and I thought it's flowery design would look cute on top of the box.

It's not neccessary that the flowers on the inside of the plate remain intact but the challenge requires that the design on the inside doesn't get broken. I was taught this game in my mosaic class when our teacher had us draw a heart with permenent marker on the center of the plate. The goal was merely to remove the outer rim and keep the heart together. On my second cut with the wheel cutters, I broke my heart. I had no other plates to practice on so I had to leave my sorry failure on the table for all to see. It was shameful.

Not long after I started buying plates but I was nervous to try the challenge again. When I felt I had a plate that didn't mind trying the challenge on, I did and again, same results. I broke my heart on the second try.

I used my digital camera this morning to show my third try. Here's a picture of the plate, the wheel cutters and the safety glasses I needed to wear:


And there's my finger also!

I placed everything in the plastic tub because when you cut into plates, glass goes everywhere. This type of glass in unpredictable. My teacher also taught us that after working on a project like this, your skin will become very zitty. This is because those tiny little glass shards that you can't see get into your skin and voila! Pimples! I still laugh at her story that when her husband saw her a few days after she completed her project he looked at her face and said, "Jesus, Wendy! What the hell happened to you?" I don't have a husband but I have looked in the mirror and said the same thing only without the Wendy part. Since taking on this hobbie, Aveeno has become my friend.


Here I am cutting. Well, not really. I 'm just setting up the shot. You can tell because I'm totally not wearing those nifty goggles.

For the challenge, I'll be using both hands and really gripping those wheel cutters hard. As you can see, I have little puny hands.

Also, I'll be cutting into the plate, not at an angle. Cutting into the plate seemed to be the method the successful people in my class used. Of course, I used that method too and broke my heart twice.

Here goes my first cut:
And crap. I failed. Again. I'm not bitter. Not at all.

That's it for Plate Challenge 2007 then. See you all in 2008 or whenever I find another plate to break. Until then I'll be showing updates on this project through out the blog.

I'm gonna go away and cuss now.

Monday, February 26, 2007

She-Devils and Garden Checkers

No, I didn't make the above mosaic but isn't it cool? I wonder who she is according to Jack Chick's demonology. This piece was made by John T. Unger.

My mosaics aren't this interesting yet but I hope one day to make a mosaic of something with giant naughty bits so I can display it in my garden.

Speaking of gardens, my second mosaic was entirely an experiment. I made it in the same class where I made the tea tray. It's a checkers board with a garden theme:


The picture is very grainy but what I did was use a coffee mug with a flower design on it and some basic stained glass squares that I bought from Michael's. The oval piece of wood came from Wal-Mart just like the tea tray did. I'm sure it was intended for some lame wood burning craft project but I saved it and made it quite lovely.

And yes. I know what you're thinking. The checker squares aren't the right dimensions. I was worried about that when I started so I tried playing checkers on it and it worked. The game is a little more unpredictable although it is short. That's okay. Like I said, this piece was experimental. Breaking apart the coffee mug was my challenge and I liked the way it came out. I tried to eliminate the curve in the cup as much as possible and keep the flower pieces together. At the top of the mosaic you can see the yellow pieces which are all part of a single flower I tried to keep.


To keep with the theme, I bought some pre-made mosaic tiles at Michael's that fit this checker board nicely:


As you can see, the ladybugs have formed a trifecta opposition stance to take on the butterfly/leaf alliance. If the game wasn't interesting before, it should be now!

Wednesday, February 21, 2007

Mosaics and Cat Butts

Welcome to my first blog ever. Yay me!

Some of you know me as Rimmi from Holeee Cow. I know, I'm a big celebrity from that blog but please, hold you fan mail. I'm new to blogs so too much attention may scare me and I might run away.

I started this blog because all my online friends have blogs so it's my turn. Like Lita and wurwolf, I've decided to blog my craftiness. I like to make mosaics and stained glass decorations but I'm very new to this. I consider myself a beginner so I can show you my work so far and all the pieces that go into it. That way I can totally stretch out my blog and not blow it all in one silly post.

I'm also very new to digital cameras. Sorry for the grainy picture. Enjoy my first work in mosaics:


This is a tea tray that I bought from Wal-Mart. I brought it to my first class on mosaics because I figured it would be the easist thing to mosaic and also the easiest thing to transport. The other ladies in the class were using tables and bowling balls. You'd think that on a first project you'd go the easy route like I did but no. Lugging tables and bowling balls into class made every bit of sense to them until week three when they realized just how stupid that really was and then they lost all their love for the craft.


That having been said, the bowling balls didn't look too bad once they were finished. Grouting was kind to the sphere shape and when the balls were placed in terra cotta pots, they looked great for gardens. It was Martha Stewarty without the big bucks.


My peice here is obviously a fishy in the water. I'm not great with my biology so I'm not sure what type of fish, nor can I tell you what body of water it's in. I guess since it's mine and I can say whatever I want, it's the ocean.


I was experimenting with colors, textures, patterns and using the tools involved. I think it turned out well for a first try but I still feel compelled to poin out the things I wish I'd done differently. The orange fish has purple fins and the purple fins on top are hard to see because I chose a similar color for the ocean so it all blends together. I should have made sure the ocean blue tiles were a little lighter in color around the top fins. My other mistake, I guess, is all in the eye of the beholder. I consider it a mistake because I really didn't know at the time but the brown/tan tiles at the bottom that are supposed to be sand are backwards. I bought them at Michael's craft store around the fourth week of my class and thought they'd look good as sand. They are smooth on one side and have lines carved into the other. I glued the smooth side and left the lines on top. I thought it looked more sandy but the instructor told me the lines were supposed to hold the glue better. I totally lied and said I did that on purpose for texture. She was impressed with my brilliance and that was that.


On the other hand, let me talk about what I did right. I love the circles I was able to cut for the sun and the bubbles. I didn't have a glass grinder so I used a wheel cutter. In a future blog I'll discuss wheel cutters. For a beginner, I think I did a damn fine job. Some thing with the curving of the seaweed. That was half wheel cutter and glass scorer. So was the tail. I'm so happy with the shape of the tail. I tried the same thing on the mouth that I used for the tail only in reverse but instead the mouth look like a beak. But! It's a parrot fish. That's it! A parrot fish! My mosaic. I'll interpret it how ever I choose. So there.


I'm quite proud of this tea tray. So much that I'd rather display it than use it. One spill on this thing and I'd have to kill someone. On my shelf it goes.

Speaking of shelves, I was using a nice, sunny shelf to take the picture of this tray. Here we come to the cat butt portion of this blog. My kitty, Emma, decided she needed to get into the picture as I was taking it. I'll spare you the pictures of her ass and my fingers and show you a nice shot of her:

Note how she only has eye whiskers on one side. She came to us that way so don't ask me why she's like that.


This concludes my first post on my mosaics. Until next time. "MLAAAAAAAAGH!"